Rails 7: API-only app with Devise and JWT for authentication

The project:
I set up to build a movie watchlists app where users can browse movies and add them to new or existing watchlists, and they can mark the movies as watched/unwatched. I decided to also document the process.
The backend is coded as a Rails API-only app and it will connect to a React/Next.JS front-end app
Each one of the articles in the series deals with a different part of creating the app and will include a walkthrough, some explanations, and some challenges I faced while coding it and how I solved them.
My previous article covered the concept, design, and database architecture for the app.
The popularity of using Rails as an API client has been rising now that many easy-to-use and deploy front-end frameworks exist. A single backend codebase can be used in both web and native applications by detaching the backend from the front end. Even if we don’t use the Rails feature that allows us to have logic in the view layer, all the other benefits still apply, mainly setting up and getting running the app quickly, without having to make a lot of trivial decisions.
In this article, I will show how to set up a Rails-API-only app with user authentication using Devise and JWT, and serialization using jsonapi-serializer.
I am using the following versions:
- Ruby: 3.1.1
- Rails: 7.0.4
- PostgreSQL: 14.5
Let’s start with a few explanations of what things are and why I chose them:
What is Authentication and why JWT:
HTTP is a stateless protocol. Every call made to the server is like a new call with no memory or “state” of the previous calls. But in reality, in applications, we generally maintain session information, for example, log-in data, to allow users to have access to certain parts and features of the application without having to log in (authenticate) with every request.
There are 2 main approaches to authentication management:
- Cookies based approach
- JWT (JSON Web Token) approach
For this application we are choosing the JWT way:
After successful authentication (verifying that the username and password match), the server generates an accessToken by encrypting the “userId” and “expiresIn” information and then sends it to the client (the browser). The browser receives this token, saves it, and then includes it with every subsequent request.
In this way, no session information is saved in the database. All the information on the current user or the “bearer” is stored in the token itself and with every request, the server will know the user just by decrypting the token, with no need for a database search for the session. Only the server that has the access token secret can decrypt the JWT token.
One disadvantage for user experience (or advantage from a security point of view) of using a JWT token is that it must have an expiration time, so if we are planning an application where the user never signs out, there are better approaches than this.
To manage authentication and sessions in our Rails app, we will use the gems: Devise and Devise-JWT.
Create the Rails API app
rails new movie-watchlists-api --api –d postgresql --skip-test-- api : Preconfigure a smaller stack for API-only apps
- d : Preconfigure for the selected database
-- skip-test : Skip test files
Enabling CORS
CORS (cross-origin resource sharing) is an HTTP-header-based security mechanism that defines who’s allowed to interact with your API. CORS is built into all modern web browsers.
In the most simple scenario, CORS will block all requests from a different origin than your API. “Origin” in this case is the combination of protocol, domain, and port.
Since our backend and front end will be hosted on different servers, we have to manually set up the application to accept requests from a different origin.
Luckily, there is a gem that will set this up for us with minimal configuration, just uncomment the following line from the gemfile:
gem 'rack-cors'run bundle install and uncomment the contents of the file config/initializers/cors.rb :
Rails.application.config.middleware.insert_before 0, Rack::Cors do allow do origins '*' # later change to the domain of the frontend app resource '*', headers: :any, methods: %i[get post put patch delete options head], expose: [:Authorization] endend
You need to pay close attention to the origins parameter. Remember that CORS needs to match protocol, domain, and port. You’ll need to specify all three correctly. So if you put http://example.com:80, but the call will come from http://example.com:8080 or https://example.com:443, then you’ll still get blocked. Leaving it as ‘*’ allows anyone to connect to your API. When first creating the app and for testing purposes, leaving it as ‘*’ is a good idea, but remember to change it when you are ready to deploy.
By default, the rack-cors gem only exposes certain headers like Content-Type, Last-Modified, etc., so we have to manually expose the ‘Authorization’ header to cross-origin requests, which will be used to dispatch and receive JWT tokens.
devise, devise-JWT and jsonapi-serializer
- devise is a gem that handles users and authentication. It takes care of all the controllers necessary for user creation (users_controller) and user sessions (users_sessions_controller). I initially wondered whether devise, which is designed to use in full-stack Rails apps, is a good choice for API-only mode, but with a few small tweaks, it works and does the job.
- devise-jwt, a gem, is an extension to devise which handles the use of JWT tokens for user authentication.
- jsonapi-serializer is a gem that will serialize ruby objects in JSON format.
in gemfile add:
gem 'devise'
gem 'devise-jwt'
gem 'jsonapi-serializer'
bundle install
Set up devise:
Run the following to create the installation files:
rails g devise:installWe need to tell devise we will not use navigational formats by making sure the array is empty in config/initializers/devise.rb. uncomment and edit the following line:
config.navigational_formats = []This will prevent devise from using flash messages which are a default feature and are not present in Rails api mode.
We also need to add the following line at the end of config/environments/development.rb
config.action_mailer.default_url_options = { host: 'localhost', port: 3001 }We will use port 3001 in our Rails app development and leave port 3000 for the React front-end app. To enable this, we also need to update the port PUMA (the default Rails server) will use in config/puma.rb
port ENV.fetch('PORT') { 3001 }Next, we create the devise model for the user. It can be named anything. we will use User
rails g devise Userthen run the first migration by executing:
rails db:create db:migrateNext, we generate the devise controllers (sessions and registrations) to handle sign-ins and sign-ups
rails g devise:controllers users -c sessions registrationswe use the -c flag to specify a controller.
For devise to know it can respond to JSON format (and not try to render a view), we need to instruct the controllers:
class Users::SessionsController < Devise::SessionsController
  respond_to :json
end
All the commented code can be removed since we will be writing our own methods to handle the steps.
class Users::RegistrationsController < Devise::RegistrationsController
  respond_to :json
end
Then we must override the default routes provided by devise and add route aliases.
Rails.application.routes.draw do
  devise_for :users, path: '', path_names: {
    sign_in: 'login',
    sign_out: 'logout',
    registration: 'signup'
  },
  controllers: {
    sessions: 'users/sessions',
    registrations: 'users/registrations'
  }
end
Now, the endpoints will be set to login, logout, and signup.
Devise works by allowing certain default parameters during user registration, for example, email, password, password confirmation, remember me, etc. In the application we are building we also want to let the user add a name and a picture (or avatar). To achieve this, we need to “sanitize” (or permit) these new parameters. We should add the following lines to the Application Controller:
class ApplicationController < ActionController::API before_action :configure_permitted_parameters, if: :devise_controller? protected def configure_permitted_parameters devise_parameter_sanitizer.permit(:sign_up, keys: %i[name avatar]) devise_parameter_sanitizer.permit(:account_update, keys: %i[name avatar]) endend
Here we permit the use of name and avatar for signup and updates of the user.
We now need to create a migration to add the name to the Users table:
rails g migration AddNameToUsers name:stringrun rails db:migrate
(I will discuss the process of adding pictures or avatars in a different article)
Set up devise-jwt
devise-jwt will handle token dispatch and authentication, which doesn’t come with devise out of the box.
JWTs need to be created with a secret key that is private. It shouldn’t be revealed to the public. When we receive a JWT from the client, we can verify it with that secret key stored on the server.
We can generate a secret by typing the following in the terminal:
bundle exec rails secretWe will then add it to the encrypted credentials file so it won’t be exposed:
#VSCode
EDITOR='code --wait' rails credentials:edit
Then we add a new key: value in the encrypted .yml file.
# Other secrets...  # Used as the base secret for Devise-JWT
devise_jwt_secret_key: (copy and paste the generated secret here)
Inside the devise initializer, we will specify that on every login POST request it should append the JWT token to the ‘Authorization’ header as “Bearer + token” when there’s a successful response sent back, and on a logout DELETE request, the token should be revoked.
in config/initializers/devise.rb at the end add the following:
config.jwt do |jwt|
    jwt.secret = Rails.application.credentials.devise_jwt_secret_key!    jwt.dispatch_requests = [
      ['POST', %r{^/login$}]
    ]
    jwt.revocation_requests = [
      ['DELETE', %r{^/logout$}]
    ]
    jwt.expiration_time = 30.minutes.to_i
end
In the JWT requests, we should delimit the regex with ^ and $ to avoid unintentional matches.
We are also setting the expiration time of the token to 30 minutes after which the user will need to authenticate again.
Revocation strategy:
As previously explained, tokens have an expiration date, they will become useless after that, but, because of their nature, they cannot realistically be revoked before that.
When would we want to revoke a token? When the user logs out.
Why would we want to revoke tokens? The bearer of the token has access granted to it, no further authentication is needed. So if a token is still active, and it somehow falls into the wrong hands, someone could access protected content and tamper with things.
The devise-jwt gem offers 3 different revocation strategies. We will use the JTIMatcher method.
from devise-jwt documentation:
Here, the model class acts as the revocation strategy. It needs a new string column named
JTIto be added to the user.JTIstands for JWT ID, and it is a standard claim meant to uniquely identify a token.It works like the following:
When a token is dispatched for a user, the
JTIclaim is taken from theJTIcolumn in the model (which has been initialized when the record has been created).At every authenticated action, the incoming token
JTIclaim is matched against theJTIcolumn for that user. The authentication only succeeds if they are the same.When the user requests to sign out its
JTIcolumn changes, so that provided token won't be valid anymore.
To use it, we need to add the JTI column in the user model. so we must create a new migration:
rails g migration addJtiToUsers jti:string:index:uniqueAnd then make sure to add null: false to the add_column line and unique: true to the add_index line.
the migration file should look like this:
class AddJtiToUsers < ActiveRecord::Migration[7.0] def change add_column :users, :jti, :string, null: false add_index :users, :jti, unique: true endend
rails db:migrate
Then we have to add the strategy to the user model and configure it to use the correct revocation strategy:
class User < ApplicationRecord
  include Devise::JWT::RevocationStrategies::JTIMatcher

  devise :database_authenticatable, :registerable, :recoverable, :validatable, :jwt_authenticatable, jwt_revocation_strategy: self
end
Working with jsonapi_serializer:
This serializer creates JSON responses following the JSON:API convention.
Since we already installed the gem using bundle install, we will create a serializer for the User model. We will call it every time we want to send user data from our API backend.
rails g serializer user id email name(we will add the picture or avatar later)
It generates a serializer with the attributes mentioned that we can later call using the following command:
UserSerializer.new(#user).serializable_hash[:data][:attributes]replace #user with the actual variable containing the user information.
After all the setups above, now we need to write the behavior of the app for user registration, login, and logout.
We will use some devise helper methods that tell the app what to do in different situations:
- respond_with: how to respond in the case of a POST (after registration or logging in)
- respond_to_on_destroy: how to respond to DELETE (after logging out)
in app/controllers/users/registrations_controller.rb:
class Users::RegistrationsController < Devise::RegistrationsController
  respond_to :json
  private

  def respond_with(current_user, _opts = {})
    if resource.persisted?
      render json: {
        status: {code: 200, message: 'Signed up successfully.'},
        data: UserSerializer.new(current_user).serializable_hash[:data][:attributes]
      }
    else
      render json: {
        status: {message: "User couldn't be created successfully. #{current_user.errors.full_messages.to_sentence}"}
      }, status: :unprocessable_entity
    end
  end
end
in app/controllers/users/sessions_controller.rb:
class Users::SessionsController < Devise::SessionsController
  respond_to :json  private  def respond_with(current_user, _opts = {})
    render json: {
      status: {
        code: 200, message: 'Logged in successfully.',
        data: { user: UserSerializer.new(current_user).serializable_hash[:data][:attributes] }
      }
    }, status: :ok
  end  def respond_to_on_destroy
    if request.headers['Authorization'].present?
      jwt_payload = JWT.decode(request.headers['Authorization'].split(' ').last, Rails.application.credentials.devise_jwt_secret_key!).first      current_user = User.find(jwt_payload['sub'])
    end

    if current_user
      render json: {
        status: 200,
        message: 'Logged out successfully.'
      }, status: :ok
    else
      render json: {
        status: 401,
        message: "Couldn't find an active session."
      }, status: :unauthorized
    end
  end
end
Since we created a Rails API-only app, sessions are disabled by default, but devise relies on sessions to function. Before Rails 7, sessions were passed as a hash, so even if they were disabled, devise could still write into a session hash. Since Rails 7, a session is an ActionDispatch::Session object, which is not writable on Rails API-only apps, because the ActionDispatch::Session is disabled. If we try to use devise in this configuration we will get the error:
ActionDispatch::Request::Session::DisabledSessionError (Your application has sessions disabled. To write to the session you must first configure a session store):
I was able to find a workaround to this problem by instructing devise to create a fake session hash. We add the following file app/controllers/concerns/rack_sessions_fix.rb:
module RackSessionsFix  extend ActiveSupport::Concern  class FakeRackSession < Hash
    def enabled?
      false
    end    def destroy; end
  end  included do
    before_action :set_fake_session    private    def set_fake_session
      request.env['rack.session'] ||= FakeRackSession.new
    end  end
end
And we make sure to include this concern in our sessions_controller.rb and registrations_controller.rb before respond_to :json
class Users::...Controller < Devise::...Controller include RackSessionsFix respond_to :json ...end
And that’s it. We can now create users, log in and log out.
Testing with Postman:
In our application terminal, run rails s to start the server.
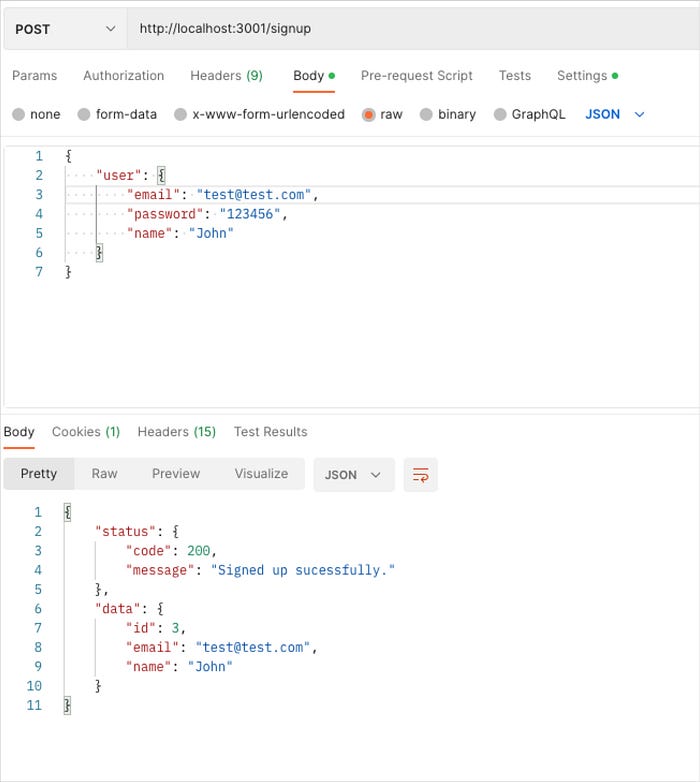
Creating a user:

It is important to note the format in which the information should be submitted.
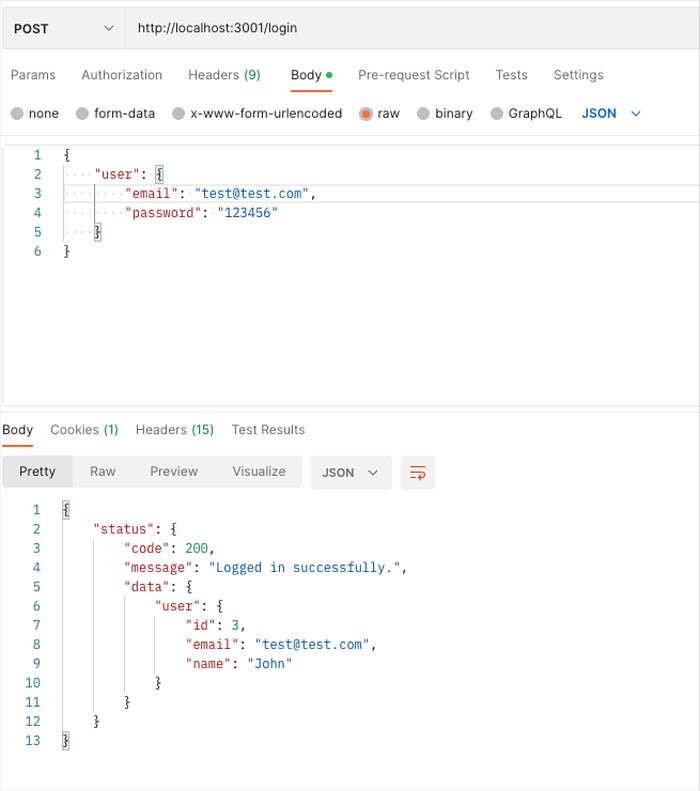
Logging in:

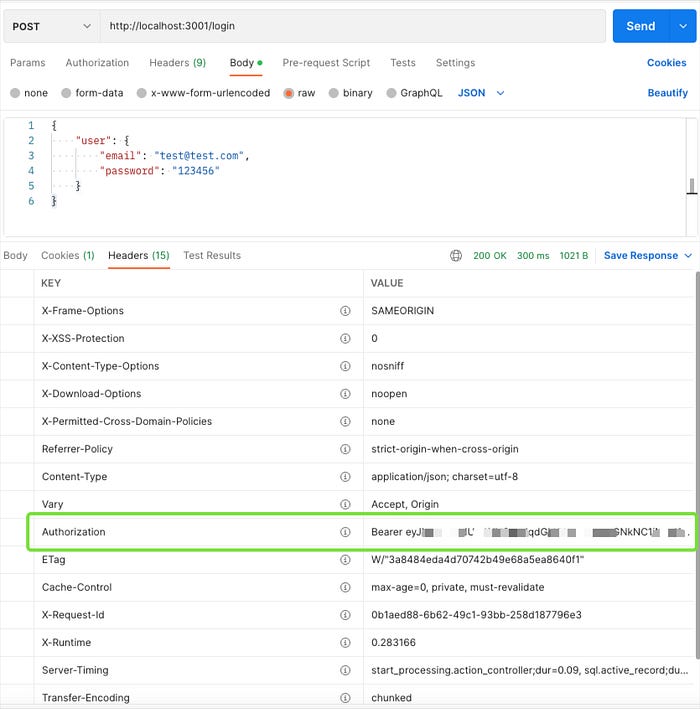
After we log in, we can check that the authorization token was received:

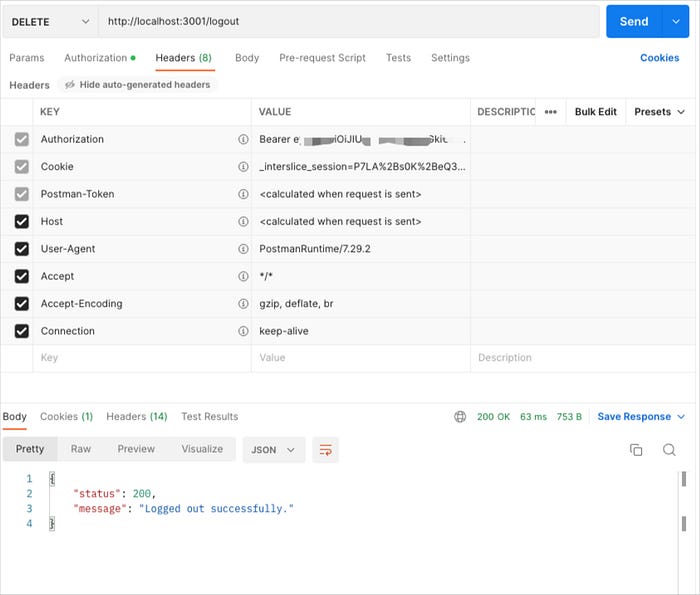
Logging out:
When we log out the authorization token needs to be passed, for testing, we have to manually add it to Postman:

For now, this is the testing we will make.
In the next article, I will explain how to add a profile picture to the User model.
